
Build stunning websites! No code, free, with AI. Export and publish anywhere.
The drag-and-drop interface simplifies web design by allowing users to visually place elements where they want them on the page. It eliminates the need for coding, making the design process accessible for users with any level of technical skill. By just selecting and moving components, anyone can create complex layouts and designs with ease, resulting in a more efficient and enjoyable web-building experience.
Responsive templates automatically adjust your website’s layout to fit any device screen, ensuring a seamless experience for viewers no matter how they access your site. This feature is crucial in today's mobile-dominated browsing, as it supports the visibility and functionality of your website across different platforms. By starting with a responsive template, designers can ensure their projects are future-proofed and accessible to the widest possible audience, boosting the site's reach and effectiveness.
Inbuilt security features help safeguard your website from digital threats like hacking and phishing. Offering peace of mind, these features protect your and your users’ data, ensuring a safe environment for everyone involved. Security tools might include SSL encryption, regular software updates, and secure hosting, which together form a robust defense against prevalent online threats. This is not just about protecting data but also about building trust with your visitors, a crucial component of any successful online presence.
Search Engine Optimization tools embedded within the builder allow users to enhance their site’s visibility on search engines. By optimizing site content right from the start, users can significantly increase their chances of ranking higher in search results, driving more organic traffic to their site. These tools might guide keyword placement, meta tags, alt text for images, and more, laying a strong foundation for a website’s long-term success in digital marketing strategies.
Integrating analytics tools into your website allows for the collection and analysis of vital data regarding visitor behavior. This information can inform decisions on content updates, design changes, and feature enhancements to better meet the needs of your audience. Understanding how users interact with your site, which pages they frequent, and where they drop off can lead to more targeted and effective improvements, ultimately increasing engagement and conversion rates for your business or personal project.
For those who need more than the basic functionalities, the ability to add custom code allows for limitless personalization and functionality. This feature enables users to implement sophisticated features and integrations that aren't available through standard plugins or widgets. Whether it's embedding third-party tools, creating intricate animations, or adding unique user interaction elements, custom code integration empowers users to bring their most complex ideas to life, giving them the ultimate control over their site's capabilities and design.
AI generation harnesses artificial intelligence to streamline the web design process, offering suggestions for layouts, color schemes, and content based on the industry and purpose of the site. This innovative feature can drastically reduce the time and effort needed to create a professional-looking website, making it accessible for beginners while offering advanced users a starting point for further customization. AI assistance is transforming how we approach web design, making it faster and more intuitive than ever before.
The ability to export and publish your website anywhere gives users unprecedented flexibility. This feature allows for the creation of a site within the platform and then exporting the final product to be hosted on any server or platform of the user's choice. It enables businesses and individuals to maintain control over their web properties and leverage the hosting solutions that best meet their needs, be it for performance, cost, or scalability reasons. This flexibility is an essential consideration for anyone looking to establish a robust online presence.
Offline mode addresses the challenge of internet dependency in web design by allowing users to work on their projects without an active internet connection. Once reconnected, changes can be synchronized with the online version, ensuring that no progress is lost. This feature is particularly useful for those who travel frequently or have unreliable internet access, ensuring that work on their website can continue uninterrupted. It promotes productivity and flexibility, allowing for the continuation of web development activities under various circumstances.

The first crucial step is to download the Mobirise application. Navigate to the official Mobirise website, select the version compatible with your operating system (Windows/Mac), and proceed with the download. Upon successful installation, launch the application to start creating your website with a user-friendly, drag-and-drop interface that requires no coding skills.
Once Mobirise is up and running, you're presented with options for how you wish to begin: use the AI Website Builder for guided creation, select from ready-made templates for quick customization, or start from a blank page to unleash your creativity. Each option caters to different levels of expertise and project visions, empowering you to take the first step in crafting your perfect website.
With your canvas set, it's time to construct your site by adding blocks. Mobirise offers a wide variety of pre-designed blocks such as headers, galleries, sliders, and contact forms. Drag and drop these blocks onto your page, and customize them to fit your content and style. Adjust colors, fonts, and imagery to mirror your brand identity, ensuring your website stands out and speaks directly to your audience.
Mobirise is inherently designed to produce mobile-friendly websites, ensuring your creation looks great on any device. Utilize the platform's built-in features to preview and adjust your site's mobile appearance. This step is crucial as mobile responsiveness greatly affects usability and search engine rankings. Take the time to review each page and block for optimal display on smartphones and tablets, enhancing user experience across all platforms.
Before publishing, thoroughly preview and test your website. Mobirise provides a Preview feature that allows you to view your site as it will appear live. Check all links, buttons, forms, and media elements for functionality. It's also essential to review your website across different browsers and devices to ensure compatibility and functionality, guaranteeing a seamless experience for all visitors.
Finally, with your website refined and ready, it's time to publish. Mobirise offers various publishing options, including direct upload via FTP to your hosting server, saving to a local drive for manual upload, or publishing to a free Mobirise site. Choose the method that best suits your needs. After publishing, share your site's URL with the world and monitor its performance to make ongoing improvements.
Mobirise HTML Builder is an intuitive and powerful drag-and-drop website builder designed for both novice and experienced developers. It offers a vast library of pre-designed blocks and themes that cater to various industries and purposes, allowing users to create fully responsive, mobile-friendly websites without writing a single line of code. The platform supports contemporary web technologies, including HTML5, CSS3, and JavaScript, providing a robust foundation for creating high-quality, professional websites. Furthermore, Mobirise integrates seamlessly with a wide range of third-party services and plugins, enhancing functionality and user engagement. Unlock your website's potential by downloading Mobirise for Windows or Mac via the buttons below or explore its capabilities with AI-driven design tools.
Adding HTML Editor to Mobirise HTML Builder takes it to the next
level.
Review from Mobirise user
My friend, of whom owns a construction company, was pleased to have me design a mobile-friendly website to include all of his services and branding materials. I did so in two days by using the HTML Builder with its powerful HTML/CSS Editor feature. It all started with simple cosmetic changes, worked my way up to renovating large houses, then to residential and industrial complexes. After completing his request, I knew it was time to write this article.
As a designer, I had to offer website creation for clients, so I began with WordPress. Then, I found the HTML builder and realized its logical and streamlined design. I was convinced this was the software to use in my work, and it has since become part of my daily routine.
I'm a fan of "If anything is worth doing, do it the right way", so when I started using HTML5 Builder, I recognized I was coming up against several minor missing pieces that couldn't be filled and were requiring me to make adjustments to my plan or accept a compromise. Over time, I got to use all of HTML5 Builder's features and these minor roadblocks came into light.
"No way they didn't think of a way to make this terrific program better!" I exclaimed. Sure enough, HTML Builder and HTML Editor have done just that. With its advanced design features and range of options, HTML Builder makes for an incredibly attractive HTML5 site. What's more, refining it with HTML Editor is a breeze – no extensive studying or time-consuming processes required!
To be able to apply this tutorial, not much coding experience is required; being able to copy/paste and change a few details such as colors and fonts is enough. You do not need to search for long either, as the comments inside the code specified which values to adapt for your website.
Hover your cursor over a previously placed block in your website project and click the blue icon to remove it. With Mobirise's HTML Maker UI its natural and intuitive to design a webpage using HTML and CSS. You have two options available in the fly out: adjust the style by applying new CSS declarations, or you can add HTML and CSS but the block parameter editing function will be disabled.
Switch up the appearance of your HTML generator by going to the Account section in the App Settings. There, you'll be presented with three different styles to choose from.
It's easier to make modifications to HTML and CSS with full-screen mode for both M5 (Bootstrap 5) and AMP (Accelerated Mobile Pages) themes. With the blue eye-like button in the bottom right corner of the HTML creator, you can inspect the changes. After making adjustments, simply apply them, and you'll be able to observe both in the HTML creator and the app. Don't worry if you make a mistake, you can quickly undo/redo anything as needed.
It's critical to have an understanding of HTML and CSS to take advantage of the many features of advanced software. Pick the building block which best embodies your vision and then further fine-tune it through both block parameters and CSS declarations. After, you'll be able to access the HTML editor for added and special modifications. To get a better idea, here are some of the examples I have come across that are quite easy and which a non-programmer can understand.
When constructing an HTML website, a helpful HTML builder can help you write code correctly in a visual way. As you're typing, the text is coloured and it will alert you if you make a mistake - most notably if you forgot to include a "}". It will then prompt you not to save before the error is fixed. In my experience, I was usually forgetting to add a "}" at the end.
Entering lines of website HTML code into the HTML Maker Custom CSS box will enable you to create custom text styles. Pencil in some code and you may be able to modify the color of the highlight, plus the text underneath! Here's the code you'll need to do that:
::selection {
    background: rgba(71, 22, 221, 0.5);
    color: #000;
}

::-moz-selection {
    background: rgba(71, 22, 221, 0.5);
    color: #000;
}
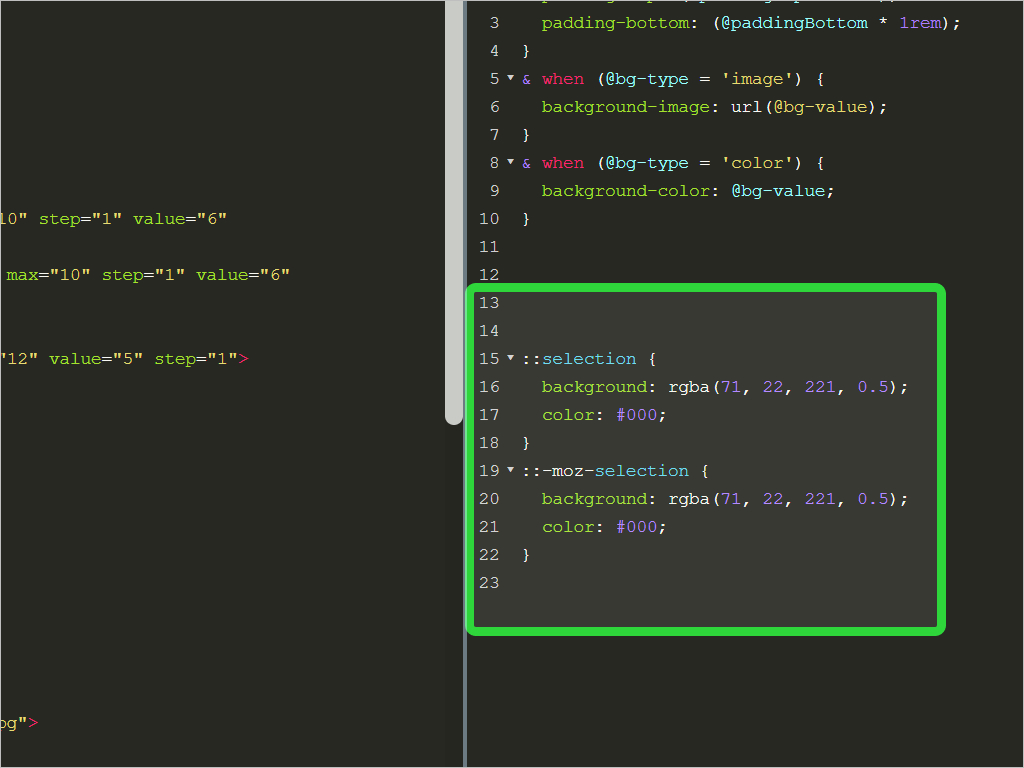
A semi-transparent highlight color may have been used, however, solid RGB or HEX could have just as easily worked.
To achieve the look of a storybook or magazine, you can employ custom CSS to alter the first letter or line of a paragraph.
/*select to which stile to apply: paragraph - p, heading - h1-h6*/
p:first-letter {
    display:block;

/*adjust the letter position for best appearance*/

    margin:5px 5px 0 5px!important;
    float:left;

/*set color and size*/
    color:#FF3366;
    font-size:3.0em;
}
If you want to create a website with a consistent style regardless of the display, review the first line and examine how it is organized. While the length of the line might differ across various displays, the organization must be taken into account as just replacing characters with lines will not guarantee a desired look. The best way to preview the design is to adjust the browser's window width and keep monitoring until needed changes are made.
To achieve a noteworthy style when quoting, make use of attractive quotation marks and text spotlight instead of the normal quoting approach. To give this effect to all of the text in a paragraph of text, this code can be utilized:
p {
    background: #f9f9f9;
    border-left: 10px solid #ccc;
    margin: 1.5em 10px;
    padding: .5em 10px;
    quotes: "201C""201D""2018""2019";
}

p:before {
    color: #ccc;
    content: open-quote;
    font-size: 4em;
    line-height: .1em;
    margin-right: .25em;
    vertical-align: -.4em;
}
p {
    display: inline;
}

p:after {
    color: #ccc;
    content: close-quote;
    font-size: 4em;
    line-height: .1em;
    margin-right: .25em;
    vertical-align: -.4em;
}
If necessary, adjust the colors of the quotation marks and backdrop.
I try to maintain a feeling of subtlety and lightness in my visuals, so I ran some tests to determine if transparent or video backgrounds would help to achieve this goal. The outcome? I found that both solutions brought that desired look to my visuals.
A majority of us likely consider two particular ubiquitous looks to be the most fitting.
The two necessary lines of code to allow the opacity of the navbar to be modified - simply fill in the custom CSS area - are as follows; when scrolling down the page, the navbar will become sticky, with a transparent result on its starting position and only a hint of color. Once stuck in place, the color will emerge a little more, yet it will still remain semitransparent throughout.
/*sets semitransparent color to sticky navbar*/

.mbr-navbar--stuck& .mbr-navbar__section {
    background: rgba(9, 67, 136, 0.5)!important;
}

/*sets semitransparent color to top navbar */
.mbr-navbar__section {
     background: rgba(9, 67, 136, 0.9);
}
Should you decide to keep the static navbar transparent, all you need to do is either remove the second code block or add a '*/' right at the end of the last line and make it a comment. The former will insure the semitransparent hue is given to the sticky navbar.
RGB refers to the combination of Red, Green, and Blue hues that make any color possible. If you want to customize the opacity of your color, however, the last value in the brackets is what you need to focus on - a value of 1 is a solid color, and 0 features full translucency. Practicing and experimenting with this variable should help you find the specific level of transparency you desire.
If you want to obtain the RGB values for the hue desired, there's no need to wrack your brains - you can use this handy online palette, which gives you numbers that are ideal for quick copy & paste. Additionally, you can opt to use your favorite image editing software as well.
His wishes included that all of his company's services be displayed on his website as well as in branding materials. Knowing the importance and complexity of a web page having styling elements from outside sources and needing assistance from our custom CSS codes to sequentially override the styling parameters, the HTML Builder Block was specially used to aid.
Adding "!important" can be used to make sure that our goals are achieved; it is a physical way of calling attention to it.
The importance of custom CSS declarations should not be underestimated. If decorating components that offer partial changing by using Block Options Flyout, this is essential to take into account. It's also to be aware that even if the corresponding option in the Block Options may appear not to work, it will still be in effect when overridden by the same setting in the Block Options. Therefore, it's advised to remember the precisely set up "critical" rules while styling a project.
Stylings have been applied to the brand name and menu items.
The navbar's ability to reflect a brand name's weight is something that can't be configured with Block Options - a feature not to be overlooked. To alter it, go to the Custom CSS section and paste the following code:
/*sets the weight of the brand name in navbar possible values are normal | bold | bolder | lighter | 100 | 200 .. to 900  */

.mbr-brand__name {
     font-weight:lighter!important;
}
and change “lighter” to the weight you find most appropriate.
a bolder font for menu items to make them stand out. Menu items should have a bolder font to provide a better contrast and make them more discernible. The exact weight of the font can be adjusted to match the style you’re going for.
.mbr-buttons__link instead of .mbr-brand__name
By using a small method – the pre-made code from a button generator from the internet – I was able to have total control over the buttons' appearance. You can find the button generator here.
Using a visual interface, you can personalize the majority of the button options. Copy the code and paste it into the Custom CSS box, then add a line to the font family defining its weight - the only change you should make.
It is wise to remember: when it comes to blocks with multiple buttons, the process is simpler: just paste the code and if need be, modify the font. If though, you are only modifying one of the buttons in the block, it would be a wise idea to make the desired color changes before styling.
Starting off with cosmetic renovations, we gradually stepped things up into taking on family homes, and eventually moved on to larger projects such as residential and industrial complexes.
You would want to replace “.btn” with:
“.btn-default” to affect transparent with white border;
“.btn-primary” to affect gray and so on:
“.btn-success” - green;
“.btn-info” - blue;
“.btn-warning” - yellow;
“.btn-danger” - orange;
“.btn-link” - transparent;
To style all the buttons in the navbar area, replace “.btn” with ".mbr-buttons__btn"
I recently attempted something new with HTML website coding and ultimately discovered a solution to a vexing problem: creating submenu items that extend from the main navigation menu. After grueling trial and error, I was able to piece together the right code, culminating in a sleek and responsive flyout menu that properly formats. HTML Website Builder allows anybody to construct an elegant page without nearly any work, however now they have to possibility of a superior navigation menu.
To ensure that the Block Options are personalized to match your preferences, it is advisable to unlock the HTML Editor first. This way, you are now ready to change the accessible options that are available to you!
In the HTML Editor, scroll down until you find the nav> tag, then pick the entire tag (in human language, start with nav> and end with /nav>).
Prior articles of mine have explained I'm more competent with Illustrator and Photoshop, so building websites came about out of a necessity due to customer needs. After that, replace the selected code with the following:
    <nav class="mbr-navbar__menu-box mbr-navbar__menu-box--inline-right">
    <div class="mbr-navbar__column">
       <ul class="mbr-navbar__items mbr-navbar__items--right mbr-buttons mbr-buttons--freeze mbr-buttons--right btn-decorator mbr-buttons--active mbr-buttons--only-links">
           <li class="mbr-navbar__item">
               <a class="mbr-buttons__link btn text-white mbr-editable-menu-item" href="https://mobirise.com" style="font-size: 14px;">HOME </a>
           </li>
           <!--this is the dropdown menu entry -->
            <li class="dropdown mbr-navbar__item open">
               <a class="dropdown-toggle mbr-buttons__link btn text-white mbr-editable-menu-item" data-toggle="dropdown" href="https://mobirise.com" aria-expanded="true" style="font-size: 14px;">
                   ABOUT<!-- remove comment tags to show the arrow <span class="caret"></span>-->
               </a>
                   <div class="dropdown-backdrop"></div>
                       <ul class="dropdown-menu pif-dropdown">
                           <!--these are the dropdown menu items -->
                           <!--replace # with target link and "Page.." with title -->
                           <li><a class="mbr-buttons__link btn mbr-editable-menu-item text-white" style="font-size: 14px" href="#">Page 1-1</a></li>
                           <li><a class="mbr-buttons__link btn mbr-editable-menu-item text-white" style="font-size: 14px" href="#">Page 1-2</a></li>
                           <li><a class="mbr-buttons__link btn mbr-editable-menu-item text-white" style="font-size: 14px" href="#">Page 1-3</a></li>
                       </ul>
               </li>
           <!--end of dropdown -->
               <li class="mbr-navbar__item">
                   <a class="mbr-buttons__link btn text-white mbr-editable-menu-item" href="https://mobirise.com" style="font-size: 14px;">CONTACT</a>
               </li>
           </ul>
       </div>
</nav>
Next paste this in the Custom CSS area:
/* dropdown styling */
/* background and text color */
.pif-dropdown {
    color:#fff!important;
    background: rgba(9, 67, 136, 0.9);
}
.dropdown-menu > li > a {
    color:#fff!important;
    text-decoration:none;
}
/* highlight on hover */
    a:hover{
    background: rgba(9, 67, 136, 0.9)!important;
}
    /* dimensions */
    .dropdown-menu {
        top: 70%;
        min-width: 80px;
}
/* open on hover - make sure to enable the caret if you disable it */
    ul.mbr-navbar__items li:hover > ul.dropdown-menu {
        display: block;
}
Final measure: View the options of your current page (represented by the green gear icon) in the App Main Menu organized under the Pages tab. Paste the fallowing code in the “Inside <head> code:” section:
<script src="https://ajax.googleapis.com/ajax/libs/jquery/1.12.0/jquery.min.js"></script>
When you hover over the wonderful dropdown menu, you'll notice the background has been changed to resemble a semi-transparent wave that we are cruising along. To better customize the rows for your website, use the advice in the comments. The wonderful thing is that you can still fine-tune the links and appearance with the HTML Builder Interface, and even duplicate them if needed. So, have some fun with it! That's all I've got.
Having access to a plentiful supply of blocks that are readily available to be added and edited, HTML website builder is a godsend. All you gotta do is to insert the right codes in the right place, and you are off and running. In order to have an accordion block included in your project, here are the scripts one must use.:
Inside <head> code (in page settings dialog):
    <script src="https://ajax.googleapis.com/ajax/libs/jquery/1.12.0/jquery.min.js"></script>
    <script src="http://maxcdn.bootstrapcdn.com/bootstrap/3.3.6/js/bootstrap.min.js"></script>
In a custom HTML block’s editor:
<!-- This is the accordion html website code -->
    <div class="panel-group" id="accordion" role="tablist" aria-multiselectable="true">
        <div class="panel panel-default">
            <div class="panel-heading" role="tab">
                <h2 class="panel-title">
                    <a class="mbr-editable-menu-item text-white" data-toggle="collapse" data-parent="#accordion" href="#collapse1" aria-expanded="true" aria-controls="collapse1">This is a Caption</a>
                </h2>
            </div>
                <div id="collapse1" class="panel-collapse collapse" role="tabpanel" aria-labelledby="heading1" aria-expanded="false" style="height: 0px;">
                    <div class="panel-body mbr-article mbr-editable-full">
                        <p>And this is the first paragraph</p>
                    </div>
                </div>
            </div>
            <div class="panel panel-default">
                <div class="panel-heading" role="tab" id="heading2">
                    <h2 class="panel-title">
                        <a class="mbr-editable-menu-item" data-toggle="collapse" data-parent="#accordion" href="#collapse2" aria-expanded="true" aria-controls="collapse2">
                            123
                        </a>
                    </h2>
                </div>
                    <div id="collapse2" class="panel-collapse collapse" role="tabpanel" aria-labelledby="heading2" aria-expanded="false">
                    <div class="panel-body mbr-article mbr-editable-full">
                    <p>sdv adv ws vadfv adfv asd</p>
                    </div>
                </div>
            </div>
            <!-- This is an accordion element - copy/paste if you need more -->
            <div class="panel panel-default">
                <div class="panel-heading" role="tab" id="heading3">
                    <h4 class="panel-title">
                        <a class="mbr-editable-menu-item" data-toggle="collapse" data-parent="#accordion" href="#collapse3" aria-expanded="true" aria-controls="collapse3">
                            sdfcas
                        </a>
                    </h4>
                </div>
                <div id="collapse3" class="panel-collapse collapse" role="tabpanel" aria-labelledby="heading3" aria-expanded="false">
                    <div class="panel-body mbr-article mbr-editable-full">
                        <p>scqaerf qef qecv ef qerf qef e</p>
                    </div>
            <!-- This is the end of the accordion element -->
                </div>
            </div>
        </div>
In the CSS Editor section of the same block:
/*@import url(undefined);*/
a {text-decoration:none;}

a:active, { outline:none; }

.panel{
    align-content: center;
}
/*set the panel color here - not neccessary a transparen one */
    .panel-heading{
        background-color:rgba(10, 20, 66, 0.5);
        color:#fff;
}
.panel-title{
    text-align:center;
    font-family:roboto;
}
Once color adjustments have been made, examine the appearance. Opting for either semi-transparent or solid RGB or HEX backgrounds will work best.
Only recently did I come to find the amazing HTML bootstrap builder, a top-of-the-line piece of software. After you set up, you can directly alter the headings and content on the program's graphical interface. Nonetheless, if you wish to include an extra accordion element, you can do so by copying and pasting the code onto an HTML editor, with guidance from the comments. It all began with WordPress, but has now changed into something powerful.
Sustainability and editability: two important goals to strive for!
Thanks to the excellent design of Mobirise, you're able to change the content of your custom pieces, while maintaining the same design, by adjusting the visual interface. Just add some of the native classes to see your changes come to life!The following are examples of such classes:
    mbr-editable-menu-item
    mbr-editable-full
    mbr-editable-content
add them to the style=”..” of your new elements and watch the magic happen!
By using mbr-article class, I made sure the content displayed in the accordion was sustainable.
Once you take the time to configure it, custom blocks provide a rewarding experience - one that is both flexible and easy to use. Put in the effort and you'll save yourself a lot of time and trouble. Don't be afraid to take risks and appreciate your successes!
My intrigue with the enormous potential of HTML Creation was the primary reason I researched further. The resource I utilized was W3C Schools, which presented numerous examples as well as comprehensive and easy-to-follow instructions concerning HTML, CSS, and Bootstrap. Although I was already knowledgeable in CSS when I began my investigation, I found that this website gifted me with a wealth of knowledge which helped in the development of this essay. My knowledge combined with my ambition and the information obtained from W3C enabled me to reach the conclusions stated.
If learning HTML to design a website isn't something you have time for, my tip is to browse the introductory tutorials and make sure you have the website at hand for when you face an issue. It'll do you a world of good!
Mobirise HTML Website Builder gives users a powerful tool to create stunning websites easily, but sometimes their creative vision gets constrained by all the predefined options. Fortunately, the HTML Editor is available for those who want to go beyond the ordinary!
Designers can go as far as their ideas and experience allow by using our clean and uncluttered interface, which is a fusion of HTML and styling possibilities. Nothing but our own creativity and capability can limit us.
As designers, we have the vision and soon found that coding wasn't difficult to master. Allowing us to utilize the supreme Website builder HTML Editor, the limits are virtually nonexistent. Now everyone can learn to create a Website with HTML and CSS quickly! Have a blast!
Mobirise HTML Builder is an innovative, user-friendly software designed for creating small to medium-sized websites, landing pages, online resumes, and portfolios without requiring deep technical knowledge or coding skills. It utilizes a straightforward drag-and-drop interface, empowering users to build visually appealing, responsive websites efficiently. With a vast library of website blocks, templates, and themes, Mobirise offers extensive customization options catering to various industries and purposes. It supports direct editing, enabling real-time website adjustments. It is ideal for non-tech savvy users aiming to publish websites quickly. Amplify your web presence by crafting professional-grade websites effortlessly using Mobirise. Download it using the buttons below to get started.
Choosing an HTML builder was crucial for the success of my digital portfolio. I settled on this particular HTML builder due to its vast template library, which provided an excellent starting point. Initially, I was concerned about customizing these templates to fit my personal brand. However, the drag-and-drop interface made this process surprisingly swift and intuitive. One significant positive was the builder's real-time editing feature, allowing me to see changes instantaneously. The downside was the learning curve related to advanced features; it took time and effort to fully utilize the SEO and analytics tools effectively. This HTML builder facilitated a seamless design experience, though, making it a valuable tool for my web development endeavors.
As a novice in web design, the thought of creating a website from scratch was daunting. My primary reason for choosing this HTML builder was its user-friendly interface and comprehensive support resources. Throughout the design process, I had questions about optimizing site loading speeds and enhancing mobile responsiveness. The builder's support team was incredibly responsive, providing clear, actionable advice. Positively, the platform's extensive library of responsive design options made my site look professional on any device. However, a minor setback was the occasional glitch when saving complex page layouts, requiring me to redo some work. Overall, this builder was instrumental in transforming my website idea into reality with minimal hassle.
I needed an HTML builder that could effortlessly integrate eCommerce functionalities into my website, and this platform stood out for its built-in eCommerce features. The simplicity with which I could add and manage products was remarkable. My primary concern revolved around payment security and checkout efficiency, but the builder offered a variety of trusted payment gateway integrations which eased my mind. On the plus side, the built-in SEO tools helped me optimize product pages with ease. However, customizing the checkout experience was a bit restrictive, limiting how I wanted the process to feel for customers. Despite this, the builder's capabilities in handling an online store's requirements were impressive and reliable.
For my photography portfolio, I wanted an HTML builder that emphasized visual elements and allowed for high-resolution galleries without compromising load times. This builder's promise of optimized image handling and a focus on aesthetics led me to choose it. Throughout the design process, I wondered how to best organize my work and whether the image compression would affect quality. Thankfully, the platform offered easy-to-use gallery layouts and maintained image fidelity impressively. A significant benefit was the platform's responsive design features, ensuring my portfolio looked great on any device. The only drawback was a slight limitation in advanced customization options, which sometimes restricted my creative vision. Nonetheless, this HTML builder was a perfect match for creating a visually stunning online portfolio.
When I first considered creating my own website, the thought alone seemed daunting. My background is in graphic design, not coding, so I was looking for something straightforward. That's when I discovered Mobirise. It promised a no-code solution, and it delivered. The drag-and-drop interface made it incredibly easy to design each webpage. I used the visual editor to finesse details without touching a single line of code. However, I wanted a custom contact form, which was a bit of a challenge. I had to do a bit of learning on HTML and integrate a third-party service. But, it was a valuable learning experience. Mobirise was the perfect launching pad for my web design journey, turning what I feared would be an uphill battle into a surprisingly enjoyable project.
As a long-time blogger accustomed to plug-and-play website builders, I was ready to level up and create a more professional and personalized website. My toolkit of choice included HTML5, CSS3 for styling, and a bit of JavaScript for interactivity. The journey from using pre-built templates to creating a site from scratch was exhilarating yet challenging. The most significant hurdle was understanding responsive design. Adjusting elements to look great on both mobile and desktop without a template was a trial-and-error process. To solve this, I utilized Bootstrap to help with the grid system and responsiveness. The result was a sleek, custom website that felt uniquely mine, a far cry from the limitations of standard blogging platforms. The experience deepened my understanding of web design and has inspired me to further explore web development.
Starting with zero knowledge in web development, I decided to dive headfirst into creating my first website for a small business. Choosing Mobirise as my foundation was a decision out of necessity—I needed something that would allow me to build a professional-looking site without the steep learning curve of coding. The process with Mobirise was smooth, with an extensive selection of pre-designed blocks that I could easily customize to fit the business identity. However, I hit a snag when trying to add custom JavaScript for an interactive feature. It was a bit outside the comfort zone of Mobirise's capabilities, requiring me to learn some basic coding. Thankfully, the online community around Mobirise and web development, in general, was incredibly supportive, guiding me through the process. This project not only resulted in a successful website but also ignited a passion for web development that I never knew I had.
Transitioning from a traditional art background to digital, I decided to take on the challenge of building my own portfolio website. With no prior coding experience, I relied heavily on Adobe Dreamweaver for its visual design interface and code editor. Initially, the blend of visual tools and code was overwhelming, but Dreamweaver’s tutorials and community forums were invaluable. I faced difficulties with CSS layout techniques, particularly Flexbox and Grid, which were crucial for organizing my artwork responsively. Through persistent experimentation and a lot of online resources, I gradually became more comfortable. The project was a significant time investment but resulted in a custom, responsive website showcasing my art. This journey has been incredibly rewarding, giving me control over my online presence and a new set of digital skills to explore.
Pros: The HTML builder has been an absolute lifesaver in expediting my web development projects. Its intuitive drag-and-drop interface makes it incredibly easy to design complex layouts without diving into lines of code. Another standout feature is the vast library of pre-designed templates and elements, which can be customized to fit any need, thereby significantly reducing development time. The responsive design options also ensure that websites look great on any device, which is a crucial factor in today's mobile-first world.
Cons: While the builder is excellent for quickly putting sites together, it sometimes generates bloated code that can affect site performance. Advanced developers may find the customization options limiting when specific, unique functionalities are needed. Additionally, reliance on the builder for complex projects can impede the development of coding skills for beginners.
Pros: The builder's user-friendly interface is perfect for beginners, offering an easy entry point into web design without needing to understand HTML intricacies. The real-time preview feature is incredibly helpful, providing instant feedback on design changes, which helps in achieving the desired look before going live. Its integration capabilities with other tools and platforms are also a major plus, enabling seamless workflows.
Cons: The HTML builder limits creativity to the confines of its available tools and elements, which can be frustrating for more experienced designers aiming for unique and out-of-the-box solutions. The platform’s dependence on subscription models for access to premium features is another downside, potentially increasing the overall cost of web development projects. In addition, exporting code from the builder to manually tweak often results in cluttered and hard-to-read code that requires cleaning up.
About
Help
Forums
support@mobirise.com
Flight Forum 40, 5657 DB Eindhoven, Netherlands
Updated
